I have started to put the control panel together. It will basically be a "Brutus Ten" control panel, though at the moment I am going to leave a couple of the switches out that where on the original plans. Here is the first look:
Top left is the main power switch. The temp controller on the left is for the mash tun and the one on the right is for the hot liquor tank. The two switches on the bottom are for the pumps. I have a couple of status lights I want to wire in to indicate when the burners are lit.
At this point just the switches and temp controllers are mounted in the box. The internal wiring will be next, along with reconfiguring some of the natural gas lines and hooking up the ASCO valves.
Wednesday, July 9, 2008
Wednesday, June 18, 2008
Blonde Update
I kegged up 43 gallons of the Blonde ale last weekend (6/15). Now that I have an idea what my fermenting losses are, I can adjust my future batch sizes accordingly. Eventually I want to get 46.5 gallons out of the fermenter so I can get three full sized standard kegs per brew. For this batch I estimated I'd loose about 1.5 gallons of beer but in reality I ended up loosing 2.5 gallons with the various yeast dumps and another 1 gallon left behind in the fermenter. I didn't have any spare growlers around or else I would have tried to get that out. By then it was after 1:00 in the morning and I was done.
Final gravity was 1.008, which is a little lower than I was shooting for, but not unexpected after the long mash at a low temperature and essentially open fermentation. ABV was 6.07%.
I sampled some of it later in the week and I have high hopes for it! It should be really coming into its own by the time our July 4th block party rolls around.
The pumps are now mounted to the frame and I have made a few other minor adjustments. I have a few more things I'd like to do before getting another batch going. That batch will be an Old Ale and one that ages nicely so it will be nice to have a few extra kegs of it around.
Monday, June 2, 2008
1.5 BBL (46.5 gallon) Brewday
It is a good thing I haven't had much of a chance to brew this year as I brewed up 1/4 of my annual household allotment on Sunday (6/1/08) ;)
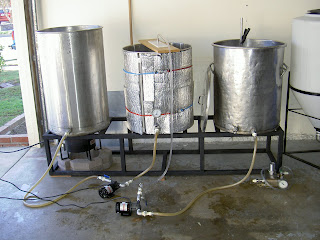
I was finally able to give my new home-brewing system a test run this last weekend. It is a single-tier system on a custom welded frame with various sized pots found from a few different sources. I'll have to detail the system more thoroughly later. Hopefully this system will one day serve as the entry level brewery for a small nano/boutique brewery I am planning.
To keep it simple and get a baseline for future brews, I decided to brew a blonde ale (and one I have made over and over again on my 10 gallon system). Recipe basics include:
So, on to the brewday!
Getting things setup and filtering/heating the strike water. Equipment, from left to right, is the boil kettle, mash tun, hot liquor tank, and the fermenter. Missing from this picture is a 2" dump valve I installed during the brewday on the bottom of the conical and the chest freezer that holds the glycol bath for recirculating through the fermenter to maintain temp control. I will have to detail that later.
Transferring the strike water.Ready to dough in. Water at 166.
Mash is ready.
Mash temp at 153.
Recirculating the mash. The temp of the mash was dropping quite a bit, so I wrapped some bubble wrap insulation around the mash tun. I was going to do this initially but thought the grain mass would be sufficient. It wasn't. Eventually it stabilized at 148.
Sparging. This is where I struggled the most. The sparge water was not near being hot enough at the end of the mash, so the mash was extended. The sparge water was finally transferred over to the HLT, but since the HLT was unheated, the temp of the sparge water slowly dropped, causing a drop in the temperature of the mash as well. I will eventually have a burner on the HLT, so multiple issues should be resolved then. I'll be able to start heating the sparge water earlier so it will be ready at the end of the mash, and I will be able to keep it heated during the entire sparging session. Pumping from the mash tun to the kettle worked great though. On my smaller system I always did that transfer via gravity. View of the Mash Tun during the sparge. I had a small issue here where I could not pump the water as fast as I normally would have. If I pumped to fast, the pressure would pop off the end caps on the arm. I think I will just end up securing them with hose or oetiker clamps.First runnings. The wort was not nearly as clear as I was aiming for, but there was no husk particulate. The Blichmann BoilerMaker false bottom seems to work great in that regard.
More runnings and finally getting back on track.Almost to a boil.Transferring to the fermenter.First view of the hop cone.Transfer to fermenter is complete (and the last of my Cascade whole hops).Hard to see, but right at 46.5 gallons. Starting gravity was 1.054! It's almost like I knew what I was doing ;)
For using the system for the first time in its basic entirety, the day went pretty good. I knew going into the day that I would have a few issues, but that was the point. I have a few small changes I'd like to make before using it again (like mounting the pumps on the frame), but nothing major. The big thing is the burners. Once I have the two natural gas burners working, I think 99% of my temp problems will go away, and that was what I was fighting with the most.
What isn't pictured is the cold side of things. I will detail that a bit later. Essentially it is a small chest freezer that contains a tub of glycol that is recirculated through a stainless steel coil inside the fermenter and controlled via a temperature probe in a thermowell.
I was finally able to give my new home-brewing system a test run this last weekend. It is a single-tier system on a custom welded frame with various sized pots found from a few different sources. I'll have to detail the system more thoroughly later. Hopefully this system will one day serve as the entry level brewery for a small nano/boutique brewery I am planning.
To keep it simple and get a baseline for future brews, I decided to brew a blonde ale (and one I have made over and over again on my 10 gallon system). Recipe basics include:
- 50 gallons
- 93 lbs of grain (94% Great Western 2-Row and 6% Briess CaraPils)
- Estimated 80% efficiency
- Starting gravity of 1.054
- 15 IBU's (Czech Saaz for bittering and Cascade for aroma)
- Fermentis US-05 dry ale yeast
So, on to the brewday!
Getting things setup and filtering/heating the strike water. Equipment, from left to right, is the boil kettle, mash tun, hot liquor tank, and the fermenter. Missing from this picture is a 2" dump valve I installed during the brewday on the bottom of the conical and the chest freezer that holds the glycol bath for recirculating through the fermenter to maintain temp control. I will have to detail that later.
Transferring the strike water.Ready to dough in. Water at 166.
Mash is ready.
Mash temp at 153.
Recirculating the mash. The temp of the mash was dropping quite a bit, so I wrapped some bubble wrap insulation around the mash tun. I was going to do this initially but thought the grain mass would be sufficient. It wasn't. Eventually it stabilized at 148.
Sparging. This is where I struggled the most. The sparge water was not near being hot enough at the end of the mash, so the mash was extended. The sparge water was finally transferred over to the HLT, but since the HLT was unheated, the temp of the sparge water slowly dropped, causing a drop in the temperature of the mash as well. I will eventually have a burner on the HLT, so multiple issues should be resolved then. I'll be able to start heating the sparge water earlier so it will be ready at the end of the mash, and I will be able to keep it heated during the entire sparging session. Pumping from the mash tun to the kettle worked great though. On my smaller system I always did that transfer via gravity. View of the Mash Tun during the sparge. I had a small issue here where I could not pump the water as fast as I normally would have. If I pumped to fast, the pressure would pop off the end caps on the arm. I think I will just end up securing them with hose or oetiker clamps.First runnings. The wort was not nearly as clear as I was aiming for, but there was no husk particulate. The Blichmann BoilerMaker false bottom seems to work great in that regard.
More runnings and finally getting back on track.Almost to a boil.Transferring to the fermenter.First view of the hop cone.Transfer to fermenter is complete (and the last of my Cascade whole hops).Hard to see, but right at 46.5 gallons. Starting gravity was 1.054! It's almost like I knew what I was doing ;)
For using the system for the first time in its basic entirety, the day went pretty good. I knew going into the day that I would have a few issues, but that was the point. I have a few small changes I'd like to make before using it again (like mounting the pumps on the frame), but nothing major. The big thing is the burners. Once I have the two natural gas burners working, I think 99% of my temp problems will go away, and that was what I was fighting with the most.
What isn't pictured is the cold side of things. I will detail that a bit later. Essentially it is a small chest freezer that contains a tub of glycol that is recirculated through a stainless steel coil inside the fermenter and controlled via a temperature probe in a thermowell.
Subscribe to:
Posts (Atom)